
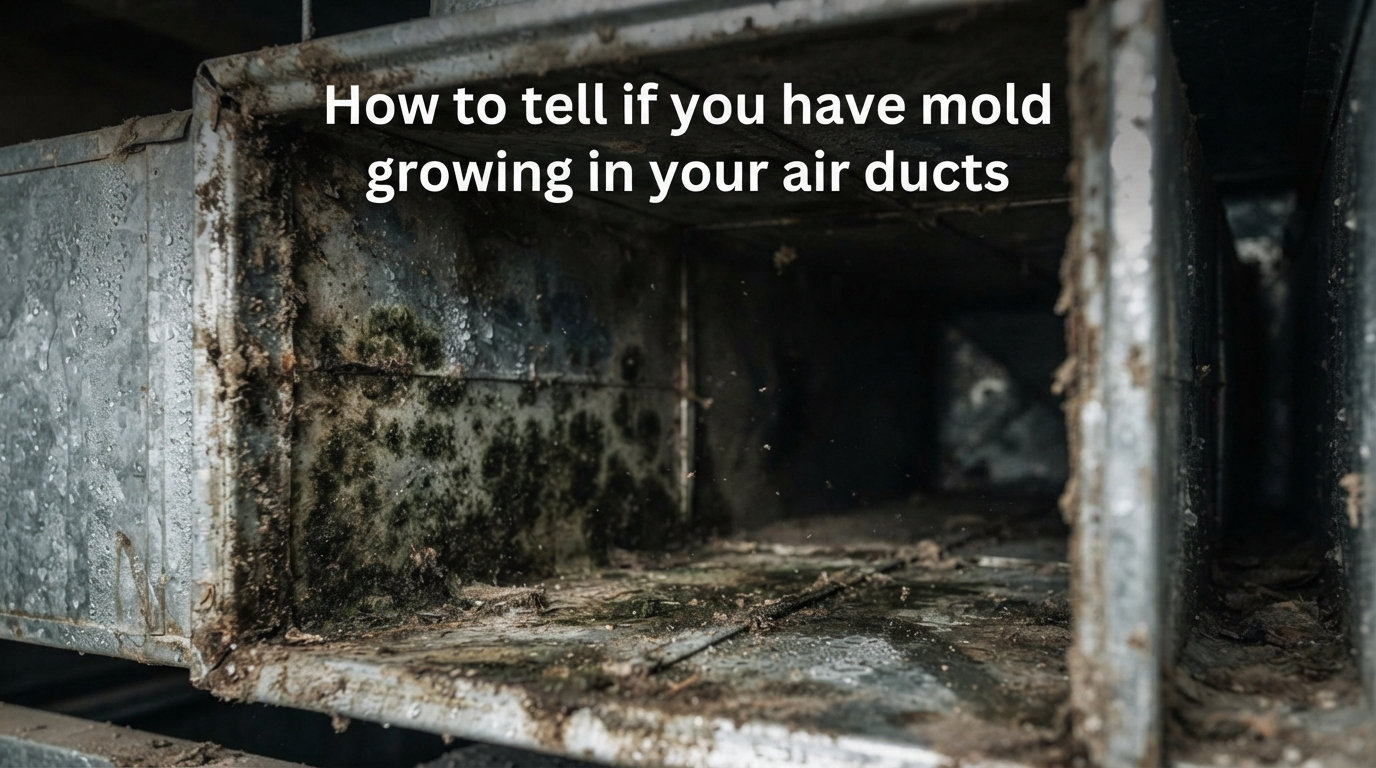
That faint musty smell hits the second your air conditioner kicks on, and you start wondering if you are breathing in something you should not be. Figuring out how to tell if you have mold in your air ducts is not paranoia — it is one of the most common indoor air quality concerns our team hears from homeowners every single year. The ductwork hidden behind your walls is the perfect hiding spot for mold spores: dark, occasionally damp, and full of the dust that mold feeds on.
Mold in your HVAC system does not stay in your HVAC system. Every time the fan runs, spores get pushed through every register in the house, settling on furniture, bedding, and — most importantly — into your lungs. Catching the problem early means a faster cleanup, lower cost, and far less risk to anyone in your home with allergies, asthma, or a weakened immune system.
This guide walks through every warning sign, the inspection steps you can do yourself, how to tell mold apart from dust and soot, when DIY cleaning is safe versus when to call a pro, and what you should expect to pay if remediation becomes necessary. By the end, you will know exactly what to look for and what to do next.
Table of Contents
What Causes Mold in Air Ducts
Mold needs three things to grow inside ductwork: moisture, a food source, and a dark environment — and your HVAC system happily provides all three. The dark part is built in. The food comes from the dust, skin cells, pollen, and debris that collects on duct walls. The moisture is the variable, and it is almost always the trigger.
Moisture Is the Main Culprit
Every air conditioning system pulls humidity out of the air, and that water has to drain somewhere. When the condensate drain line clogs, the drain pan cracks, or the ductwork is poorly insulated, water collects inside the system. Add a humid climate, a damp basement, or a crawl space return, and you have the perfect breeding ground for mold spores in ventilation.
Temperature differences cause problems too. In summer, cold air moving through ducts that sit in a hot attic creates condensation on the outside of the metal — and any moisture near the duct will eventually find its way in. In winter, heated air hitting cold exterior-wall ducts can produce the same effect in reverse.
Dust and Debris Feed the Growth
Mold cannot eat metal or fiberglass on its own. It feeds on the organic layer of dust that coats the inside of neglected ductwork. A home that skips regular filter changes, has pets, or has had recent renovations will have more dust, which means more food for any spores that land there.
This is why a brand-new duct system rarely grows mold — and why a 20-year-old system that has never been cleaned is a prime candidate. Once a small colony forms, the air handler keeps pulling in fresh spores and recirculating them.
8 Warning Signs You May Have Mold in Your Air Ducts
Most homeowners notice mold in their air ducts through a combination of smell, sight, and how they feel. Here are the eight signs our team looks for first when a homeowner suspects air duct contamination — ranked roughly from most common to most serious.
1. Musty Odor When the System Runs
A damp, earthy, basement-like smell that intensifies the moment your HVAC turns on is the single most reliable warning sign. That odor comes from microbial volatile organic compounds, or mVOCs, which are gases released by actively growing mold. If the smell disappears when the system is off and returns when the blower kicks on, the source is almost certainly inside the ductwork.
One quick test: walk from room to room while the system is running. If the smell is strongest right at the supply registers and weaker everywhere else, your ducts are the likely culprit rather than a damp basement or crawl space.
2. Visible Black, Green, or White Growth Near Vents
What does mold in air ducts look like? It usually appears as fuzzy or slimy patches on or around vent covers, on the ceiling near the register, or on the metal grille itself. Colors range from black and dark green to white, gray, brown, or even orange and pink. Anything that looks alive — textured, spreading, or damp — should be treated as suspect until proven otherwise.
Pay special attention to the underside of the vent cover and the inside edge of the register boot. Those hidden ledges are where condensation collects and where mold tends to start before spreading outward.
3. Unexplained Allergy or Asthma Flare-Ups
If you or anyone in your household starts sneezing, coughing, or reaching for an inhaler more often — especially indoors and especially when the AC or heat is running — mold is a prime suspect. Mold spores are powerful allergens, and allergic reactions from HVAC contamination tend to follow the system’s run cycle.
Track whether symptoms ease when you leave the house for the day and return when you come home. That pattern is a strong indicator that something in your indoor air is the trigger.
4. Skin Irritation and Watery Eyes Indoors
Mold exposure does not only affect the respiratory system. Itchy skin, rashes, watery eyes, and a scratchy throat are also common mold exposure symptoms. These reactions often show up in people who never had allergies before, which makes them easy to dismiss as a passing cold or dry air.
If multiple people in the household develop similar symptoms at the same time, and those symptoms clear up after a day or two away from the house, treat it as a serious air quality red flag.
5. Black Streaks or Dust Around Vent Covers
Black streaks fanning out from supply vents on ceilings and walls is a phenomenon HVAC professionals call thermal ghosting, and while it is not always mold, the two often appear together. The streaks form when fine particles — dust, soot, mold spores, or all three — deposit on cooler surfaces near the vent where air velocity drops.
Wipe the streak with a damp white cloth. If the residue smells musty or returns quickly after cleaning, mold is likely contributing. If it wipes clean and does not smell, you may be dealing with dust, candle soot, or a gas-burning appliance issue instead.
6. Persistent Headaches or Fatigue at Home
Some molds produce compounds that can cause headaches, dizziness, difficulty concentrating, and a general sense of fatigue in sensitive people. These symptoms are easy to blame on stress, poor sleep, or seasonal allergies, which is why mold often goes undiagnosed for months.
Keep a simple log for two weeks — note when headaches hit and where you are when they start. A pattern that lines up with time spent at home, particularly in certain rooms, is worth investigating.
7. Worsening Symptoms in Vulnerable Household Members
Children, older adults, pregnant women, and anyone with asthma, COPD, cystic fibrosis, or a compromised immune system are hit hardest by mold exposure. If a household member in one of those groups seems to be getting sicker with no other explanation, do not wait — have the air and ducts tested.
Pets can also show signs. Watch for unexplained sneezing, coughing, lethargy, or skin issues in dogs and cats, particularly if they spend most of their time indoors.
8. Slime or Wet Patches Inside the Ductwork
This is the most definitive visual sign, but it requires removing a vent cover or opening an access panel to see. A black, green, or brown slimy coating on the inside of the duct, on the air handler coil, or in the condensate drain pan means active mold growth — not just spores.
Visible slime anywhere in the system should be treated as a professional-level problem. DIY cleaning rarely removes it completely, and the moisture source must be fixed or the mold will return within weeks.
Mold vs Dust vs Thermal Ghosting — How to Tell the Difference
This is the question that fills up Reddit threads in r/Mold, r/hvacadvice, and r/HomeImprovement every week: is that dark stuff in my vent mold, dirt, or something else entirely? Mixing them up leads to either panic or complacency, and both are expensive mistakes.
Real mold is textured. It looks fuzzy, velvety, slimy, or powdery, and it usually grows in irregular patches that spread outward from a starting point. Color ranges from black and dark green to white, gray, brown, or even bright orange and pink. Most importantly, mold smells — that musty, earthy odor is the giveaway even when you cannot see the colony.
Plain dust and dirt is uniform, dry, and gray or tan. It wipes off cleanly with a damp cloth and does not smell. If your vent cover is gray and dusty but the cloth comes away clean and odorless, you have a dust problem — fixable with a filter change and a vacuum, not a remediation crew.
Thermal ghosting appears as black streaks or shadows on walls and ceilings near vents, caused by fine particles depositing where temperature differences create micro-currents. It is often mistaken for black mold but is really just soot, dust, or skin cells collecting on cooler surfaces. It is not alive, does not smell, and does not spread on its own — though it can indicate an air quality issue worth investigating.
Soot from candles, gas appliances, or a cracked heat exchanger is another lookalike. Fine black dust on surfaces near vents, especially combined with frequent candle burning or an older gas furnace, points to combustion byproducts rather than mold. A carbon monoxide check is a smart move if you suspect this.
The simple home test: wipe the spot with a damp paper towel, then sniff it. Mold will smell musty and may leave a colored residue that smears rather than lifts cleanly. Dust wipes up gray and odorless. Soot smears black and greasy. If the smell test is unclear, a DIY mold test kit or a professional inspection will settle it.
How to Inspect Your Air Ducts for Mold (DIY Steps)
You can perform a meaningful first inspection of your own ducts without specialized equipment. The goal is not to confirm the species or extent — that needs lab testing — but to spot obvious signs that justify a closer look by a professional.
Gather your safety gear first. Wear an N95 or P100 respirator, rubber gloves, and safety goggles. Mold spores inside ductwork are concentrated, and the last thing you want is to inhale a cloud of them while disturbing the area. Open windows and run a portable fan pointing outward if you can.
Step 1 — Inspect every visible vent. Remove the vent covers from at least three or four supply registers in different rooms, including the one closest to the air handler. Use a flashlight to look inside the first two to three feet of duct. Note any discoloration, fuzzy growth, water stains, or slime.
Step 2 — Check the air handler and coil. Turn off power to the system at the breaker. Remove the access panel on the indoor unit and shine a flashlight on the evaporator coil, the drain pan beneath it, and the blower wheel. These are the wettest parts of the system and the most common starting point for mold growth.
Step 3 — Look at the condensate drain pan and line. Standing water in the pan, algae-looking slime in the drain line, or water stains around the unit all indicate the moisture problem that lets mold take hold. A pan that drains freely should be nearly dry between cooling cycles.
Step 4 — Inspect the return side. The return grille and the duct leading back to the air handler pull air in from your living space, so they collect the most dust and debris. Look for heavy buildup, dark patches, or any signs of moisture damage on surrounding drywall.
Step 5 — Smell each register. With the system running, hold your nose a few inches from each supply vent and take a careful sniff. A consistent musty smell at multiple registers is a strong indicator that the source is in the ductwork or air handler rather than a single room.
Step 6 — Document everything. Take clear photos of anything suspicious, including close-ups and wider shots showing location. If you end up calling a professional, those photos help them quote accurately and skip the discovery phase.
Stop and call a pro if you see growth extending more than a few feet into the duct, if it is wet or slimy, or if anyone in your household has respiratory issues. Surface-level spotting near a vent cover is reasonable to clean yourself, but extensive contamination is not a DIY job.
How to Test Air Ducts for Mold
Visual inspection can tell you whether something is growing in your ducts, but it cannot identify the species or how serious the exposure is. For that, you need actual testing. There are two practical paths.
DIY Mold Test Kits
Home mold test kits cost around $30 to $60 and typically include petri dishes that you set out near a supply register while the system runs. After a few days of incubation, you mail the dish to a lab for around $40 more, and they identify what grew.
These kits have real limitations. They tell you what landed on the plate during the test window, not the actual spore count in your air, and almost every home shows some mold growth — mold spores are everywhere. Use them as a screening tool, not a final diagnosis. A kit that comes back with heavy growth of a known problematic species like Stachybotrys or Aspergillus is a clear sign to call a professional.
Professional Air Sampling and Lab Analysis
A certified mold inspector will use calibrated pumps to pull a known volume of air through a spore trap cassette, then send it to an accredited lab for comparison against an outdoor baseline sample. The report shows spore types and counts per cubic meter, which is the only way to know whether the levels inside your home are actually elevated.
Expect to pay $250 to $600 for a basic air sampling inspection, more if you want surface sampling on suspected growth. The report also documents conditions for insurance or real estate transactions, which DIY kits cannot do.
What Kills Mold in Air Ducts (DIY vs Professional)
Killing mold in air ducts means more than wiping it down with bleach — in fact, bleach is the wrong tool for porous surfaces because it cannot reach the root structure. The right approach depends on how much mold you have, where it is, and what caused it.
When DIY Cleaning Makes Sense
Small, dry patches on a vent cover or the first few inches of an accessible duct can be cleaned by a careful homeowner. Use an EPA-registered antimicrobial cleaner, not household bleach, and scrub with disposable wipes you throw away in a sealed bag. Wear your N95 respirator, gloves, and goggles the entire time.
After cleaning, fix the moisture source. If you remove the visible growth but leave a damp duct or a clogged drain pan, the mold will be back within a month. Run the system fan for a few hours to dry the area, and consider installing a UV-C light in the air handler to discourage future growth.
Skip DIY entirely if the growth is wet or slimy, if it extends into ductwork you cannot reach, if anyone in the home has respiratory conditions, or if you suspect the problem covers more than about 10 square feet. Those situations need professional containment.
When to Call a Professional
Professional mold remediation in HVAC systems follows EPA guidelines that most homeowners cannot replicate. Crews build containment around the work area, run HEPA-filtered negative air machines to keep spores from spreading, use commercial HEPA vacuums to physically remove growth, and apply antimicrobial treatments to the cleaned surfaces.
Call a pro if you find growth inside the main trunk line, on the evaporator coil, in flex duct that runs through inaccessible spaces, or anywhere in the system that you cannot fully see and reach. Also call if the smell persists after DIY cleaning, or if household members are still symptomatic after a week or two.
What to Expect From Professional Mold Remediation
A reputable mold remediation company will start with an inspection and moisture assessment, give you a written scope of work, and contain the work area before any cleaning begins. The actual process usually takes one to three days for a single residential HVAC system, depending on the extent and the type of ductwork involved.
Typical costs in 2026 run from about $500 for a small, accessible section up to $3,000 or more for whole-system contamination that includes the air handler, main trunk lines, and multiple branch runs. Replacing flex duct rather than cleaning it is often the better long-term call when growth is extensive — new flex duct is relatively inexpensive compared with the labor of properly cleaning contaminated ducting, and it eliminates the question of whether the mold was fully removed.
Get at least three quotes, ask for references and proof of certification (IICRC or similar), and avoid any contractor who wants to spray a fog of antimicrobial through the system without physically removing the visible growth. Fogging masks the problem temporarily but does not eliminate it.
How to Prevent Mold From Coming Back
Once you have dealt with a mold problem, the goal is to never deal with it again. Prevention comes down to controlling moisture, keeping the system clean, and removing the conditions mold needs to thrive. Here is what our team recommends.
1. Control indoor humidity. Keep relative humidity between 30 and 50 percent. In humid climates, a whole-house dehumidifier tied into the HVAC system is one of the best investments you can make. Portable units work for single rooms.
2. Change filters on schedule. A clean pleated filter captures the dust that feeds mold and improves airflow so the coil stays drier. Check the filter monthly and replace it at least every three months — more often if you have pets or run the system constantly.
3. Keep the condensate drain clear. Pour a cup of white vinegar down the condensate drain line every few months to prevent algae and sludge buildup. If water ever backs up into the drain pan, clear the line the same day.
4. Insulate ductwork in unconditioned spaces. Ducts running through hot attics or cold crawl spaces sweat when temperatures collide. Proper insulation prevents the condensation that starts the mold cycle.
5. Run the fan on auto, not on. Continuous fan operation can keep ductwork damp by constantly moving humid air over cooler surfaces. Letting the fan cycle with the compressor gives the system time to dry out between runs.
6. Consider UV-C lights in the air handler. Ultraviolet lights installed near the evaporator coil kill mold spores and bacteria as air passes by. They are not a substitute for cleaning but they are a strong preventive measure in damp climates.
7. Schedule regular professional maintenance. An annual HVAC tune-up includes coil cleaning, drain pan inspection, and system checks that catch moisture problems before they turn into mold problems. The cost is a fraction of remediation.
8. Address water leaks immediately. A roof leak, plumbing leak, or flood that wets ductwork or the surrounding area needs attention within 24 to 48 hours. Mold grows fast under those conditions.
FAQs
Is it common for mold to grow in air ducts?
Yes, mold in air ducts is fairly common, especially in humid climates, older homes with poorly insulated ductwork, and systems with clogged condensate drains. The dark, occasionally damp environment inside HVAC ductwork is exactly what mold spores need to grow. Regular maintenance and humidity control prevent most cases.
What are the first signs of mold sickness?
Early symptoms of mold exposure usually include a runny or stuffy nose, sneezing, itchy or watery eyes, a scratchy throat, and a mild cough. Some people also report headaches, fatigue, and skin irritation. These symptoms often worsen indoors, especially when the HVAC system is running, and improve when you leave the house.
How do I test my air ducts for mold?
You can start with a DIY mold test kit placed near a supply register while the system runs, then mail the sample to a lab for identification. For a definitive answer, hire a certified mold inspector who uses calibrated air sampling pumps and compares indoor spore counts to an outdoor baseline. Professional testing typically costs $250 to $600.
What kills mold in air ducts?
An EPA-registered antimicrobial cleaner applied to physically removed growth is the right approach, not bleach. Small patches on accessible surfaces can be cleaned by a homeowner wearing an N95 respirator and gloves. Larger or hidden contamination requires professional remediation with HEPA vacuuming, containment, and antimicrobial treatment.
Is mold in air ducts dangerous?
Mold in air ducts can be dangerous for people with asthma, allergies, COPD, cystic fibrosis, weakened immune systems, as well as for young children and older adults. Healthy adults usually experience only mild allergy-like symptoms. The level of risk depends on the type of mold, the extent of growth, and how long exposure continues.
Can mold grow in air ducts in winter?
Yes. Winter mold happens when warm heated air meets cold ductwork in exterior walls or unconditioned spaces, creating condensation inside the ducts. Homes with humidifiers set too high, or with ductwork in cold attics and crawl spaces, are especially vulnerable. Year-round humidity control and proper insulation prevent it.
Conclusion
Knowing how to tell if you have mold in your air ducts comes down to four simple checks: trust your nose for the musty smell, look for visible growth and black streaks near vents, pay attention to any unexplained allergy or respiratory symptoms, and inspect the air handler and drain pan for moisture. If two or more of those signs line up, it is time to test or call a professional.
The fastest next step is a 30-minute walk-through inspection with a flashlight, an N95 mask, and your phone’s camera. Document what you find, note when symptoms hit and clear up, and use that information to decide whether DIY cleaning is enough or whether you need professional remediation. Catching mold early is always cheaper, faster, and safer than waiting until the smell is impossible to ignore.