
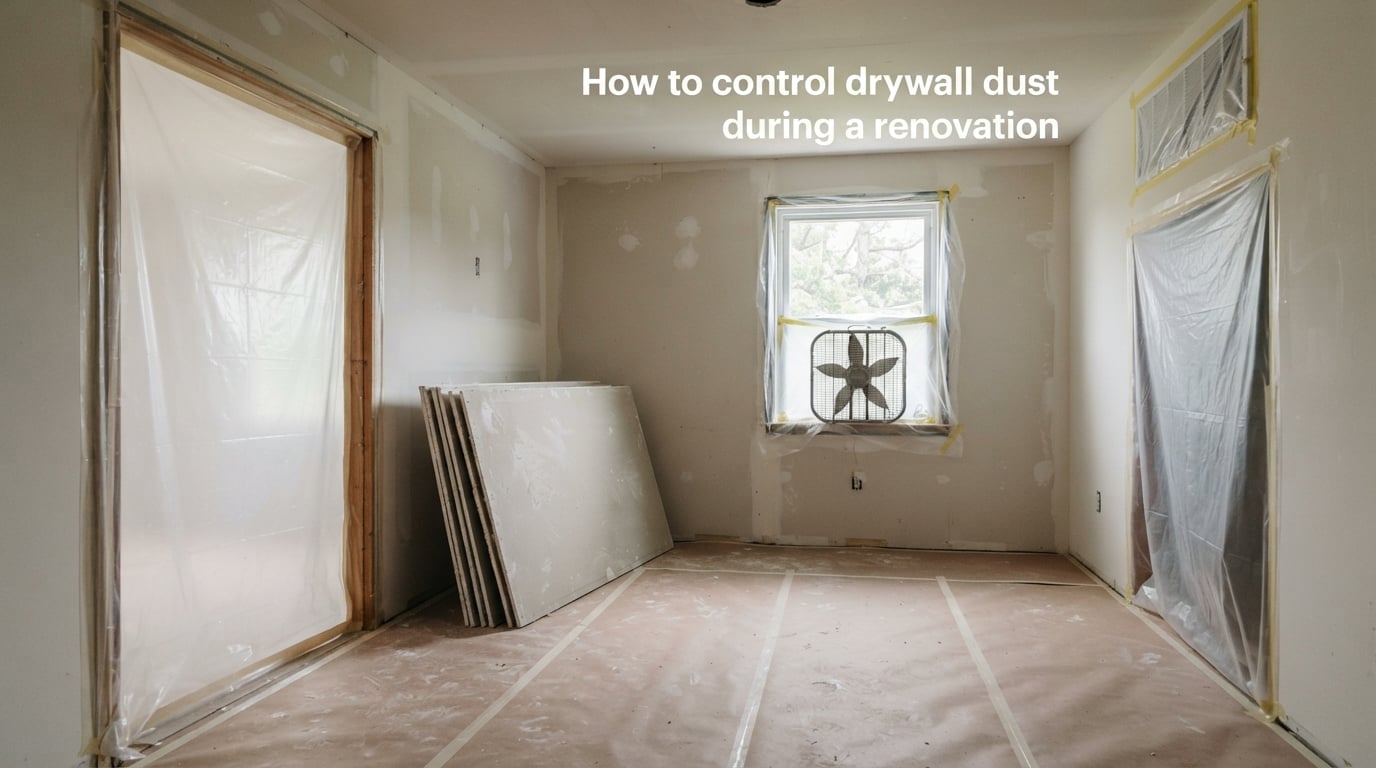
Learning how to control drywall dust during a renovation saves your HVAC system, your furniture, and your lungs. Drywall dust is a fine particulate matter created when cutting, sanding, or finishing drywall panels during renovation projects. Once airborne, those particles travel through every open vent and doorway in your home. Updated for 2026, this guide covers the exact methods our team has used on real renovation projects, from sealing the room to the final mop-down.
Table of Contents
How to Control Drywall Dust During a Renovation: The Complete Method
Drywall dust control works by containing particles at the source, sealing airflow paths, and exhausting contaminated air outside. Below is the full method in seven practical steps. These are the same steps professional contractors follow on job sites where the homeowner is still living in the home.
- Set up plastic barriers and zip walls before any cutting or sanding starts.
- Turn off the HVAC system and seal every supply and return vent.
- Swap the furnace filter for a fresh, high-MERV rated filter.
- Set up a box fan in a window to create negative pressure and exhaust air outside.
- Use wet sanding for finishing work whenever the schedule allows.
- Run a Shop-Vac with a drywall-rated filter throughout the workday.
- Damp-mop walls and floors the moment each phase ends.
Before You Start: Plan Your Dust Containment Strategy
A short planning phase makes the rest of the project faster and far cleaner. Walk through the work area and identify every opening where dust can escape. That list includes doorways, supply vents, return vents, attic hatches, electrical outlets on shared walls, and any gaps around plumbing penetrations.
I always start by sketching a simple floor plan and marking the dust boundaries. The goal is one sealed work zone with one controlled exhaust path. Multiple openings create air paths that pull dust deeper into the home, so identify every gap before you buy supplies.
Budget for dust containment supplies at the start, not after the first mess. You will need plastic sheeting (4 mil or thicker), painter’s tape, zip wall poles, magnetic vent covers, a box fan, a Shop-Vac with a fine dust filter, and at least one extra furnace filter. Setting these aside the day before prevents the all-too-common rush back to the hardware store mid-project.
Supplies Checklist for Drywall Dust Control
- Plastic sheeting (4 mil or thicker, sized to your work area)
- Zip wall poles and painter’s tape
- Magnetic vent covers or plastic bags and tape
- Box fan rated for window mounting
- Shop-Vac with a fine dust or HEPA filter
- Mop, microfiber cloths, and a spray bottle for dampening dust
- Two spare furnace filters (MERV 11 or higher)
- N95 respirators for everyone in the home
Containment: Sealing the Room With Plastic Sheeting
Sealing the work area with plastic sheeting is the single most effective step for keeping dust contained. Plastic sheeting acts as a physical barrier that traps dust inside the work zone. Without it, even the best HVAC sealing cannot stop dust from drifting under doors and through gaps in trim.
How to Hang Plastic Sheeting the Right Way
Start by closing every door inside the work area. Then run a single sheet of plastic across each doorway, sealing the edges with painter’s tape. For larger openings, set up zip wall poles to hold the sheeting taut. A loose sheet billows and pulls dust out of the room every time the door opens.
Overlap seams by at least six inches and tape both sides of the overlap. Dust finds any weakness in the seal, and a folded seam lets much less air through than a single cut edge. For ceilings that have been opened, extend the plastic across the entire opening rather than taping around individual joists.
Common Containment Mistakes to Avoid
Do not rely on a closed door as your only barrier. A standard 1/8-inch gap under a door lets surprising volumes of dust pass. Do not reuse thin plastic from painting projects; it tears mid-job and you will start over. Do not forget attic hatches or returns located in closets; I have walked into homes where a single missed return vent defeated an otherwise tight seal.
HVAC Management: Turn Off and Seal Every Vent
Turning off the HVAC system and sealing vents prevents the ductwork from spreading dust to every room. Your furnace fan moves serious air volume, and that fan pulls dust deep into the system if you leave it running. Once dust is in the return ducts, it continues blowing out of supply vents for weeks.
The Vent Sealing Procedure
Switch the thermostat to OFF before any cutting or sanding begins. Then cover each supply vent with a magnetic cover or a taped plastic bag. Cover every return vent the same way. Returns pull harder than supplies, so a missed return vent can pull dust across a much larger area in minutes.
After sealing the vents, replace the furnace filter with a fresh MERV 11 or MERV 13 filter. A clogged filter fills with dust, reduces airflow, and can let dust blow past the filter media back into the ductwork. Keep a spare filter on hand and swap it again at the end of the project.
Why HVAC Is the Biggest Dust Spreader
Indoor air quality researchers consistently show forced-air systems are the fastest path for particulates between rooms. The well-known insurance piece on home remodeling pointed this out years ago: HVAC is the most important single system to control during any dust-generating work. Sealing vents and turning off the system is faster and cheaper than cleaning dust out of ductwork afterwards.
Ventilation: Set Up Box Fans for Negative Pressure
A box fan placed in a window creates negative pressure that exhausts dust outside instead of letting it settle indoors. Negative pressure means the work area has slightly lower air pressure than the rest of the home, which pulls fresh air in through gaps and pushes contaminated air out through the fan. This keeps dust moving outward rather than spreading to other rooms.
Setting Up an Exhaust Fan
Mount a 20-inch box fan in a window closest to the work area, blowing out. Seal the gap around the fan with cardboard and tape so air pulls only through the fan blades. Open a window on the opposite side of the home or crack a door to the outside to provide make-up air.
A simple MERV-rated furnace filter taped over the fan grille catches the heaviest dust before it leaves the system. Some homeowners skip the filter and exhaust everything to the street, which works but spreads visible dust onto neighboring cars and patios. The filter keeps neighbors happy without reducing airflow enough to matter.
When to Skip the Fan
Skip the fan in cold weather if it will freeze pipes or in homes with radon mitigation systems, since exhausting air out a window can reverse the radon fan’s pressure balance. In those cases, rely on sealing and a HEPA air purifier inside the work area instead.
Sanding Techniques: Wet Sanding vs Dry Sanding
Wet sanding reduces airborne dust by trapping particles in a moist sponge rather than launching them into the air. Dry sanding is faster and gives a smoother finish on some joints, but it produces the heavy dust clouds that drive most renovation complaints. Most pros use both, depending on which coat they are on.
Wet Sanding: When and How
Use wet sanding on the final pass of compound between coats, especially on smooth drywall finishes. Lightly mist a sponge or rag and wipe the joint in circles. The dust mixes with the water and stays on the wall instead of becoming airborne. Allow a few extra minutes for the wall to dry before priming.
Wet sanding takes longer per square foot than dry sanding, so it is best used for small repair patches and final finish passes rather than full-house sanding. Professional drywallers use wet sanding specifically for the last 10 percent of work where dust control matters most.
Dry Sanding: When It Still Makes Sense
Use dry sanding for the heavy material removal between coats, where speed matters more than dust. Pair dry sanding with a Shop-Vac hose held against the sanding pad to capture dust at the source. Random-orbit sanders with built-in dust collection ports work especially well when connected to a HEPA-rated Shop-Vac.
Dust-Control Joint Compound
Several manufacturers sell low-dust joint compound, sometimes called dust-control mud, that causes particles to clump and fall straight down rather than float. The tradeoff is a slightly longer drying time and a higher per-bucket cost. Homeowners who tried it on the Home Improvement forums report it cuts visible dust dramatically on flat surfaces but does not eliminate the need for barriers.
Protect Your Floors During the Work
Floors collect the heaviest dust load because dust falls and lands there first. Protecting floors before work begins saves hours of cleanup. Lay rosin paper or canvas drop cloths over every square foot of floor in the work area, and tape the edges so the covering does not shift.
For carpeted areas that cannot be fully sealed out, lay plastic sheeting over the carpet and tape it down at the edges. Dust that settles on plastic can be folded up and thrown away at the end of the day. Hardwood and laminate floors benefit from a layer of rosin paper taped at the seams because it grips better than plastic and does not become slippery underfoot.
Cleanup Strategy: Daily and Final Cleanup
Daily cleanup keeps dust from migrating at the end of each workday, while final cleanup resets the home to livable condition. Skipping daily cleanup means dust has 16 hours to drift before you touch it again. Spending 15 minutes at the end of each work day saves several hours at the end of the project.
End-of-Day Cleanup Routine
- Run the Shop-Vac across every floor surface in the work area.
- Damp-mop hard floors with a microfiber mop head.
- Wipe down plastic barriers with a damp cloth to pull settled dust off the surface.
- Empty the Shop-Vac canister outside, not in the home bathroom.
- Replace the furnace filter if the original is visibly loaded.
Final Cleanup Once Work Is Complete
After the last sanding pass, leave the box fan running for 24 hours with the furnace still off. This exhausts any remaining airborne dust to outside. Then remove the plastic barriers one at a time, folding the dusty side inward so dust does not shake loose.
Damp-mop walls from top to bottom with a microfiber mop, working in sections. Drywall dust sticks to painted walls surprisingly well, and dry wiping often smears it into the paint. A slightly damp microfiber head lifts the dust without streaking.
Health and Safety: Is Drywall Dust Dangerous?
Yes, drywall dust is dangerous with repeated exposure, and the danger grows with how much you breathe and how long you breathe it. Drywall dust contains calcium sulfate, silica from joint compounds, and various additives depending on the product. The silica component is the most concerning because prolonged inhalation of fine silica particles can cause silicosis, a serious lung disease.
Short-term exposure irritates the eyes, nose, throat, and lungs. Long-term exposure has been linked to chronic bronchitis and other respiratory conditions, especially in workers who handle drywall regularly. Homeowners doing one remodel face far less cumulative exposure than professional drywallers, but the risk during the project itself is real. Respiratory safety guidance updated in 2026 still treats fine construction dust as a meaningful indoor air hazard worth filtering aggressively.
Will N95 Protect Against Drywall Dust?
An N95 respirator does protect against drywall dust when fitted and worn correctly. N95 filters capture at least 95 percent of particles 0.3 microns and larger, and most drywall dust particles fall in that range. The mask must form a tight seal around the nose and mouth, with no gap at the chin or cheeks.
For higher protection, an N100 or P100 respirator offers an extra margin of safety and is widely available at hardware stores. Disposable N95s work for short sanding sessions; reusable elastomeric respirators cost more up front but save money across multiple projects. Anyone with asthma, COPD, or other respiratory conditions should consult a doctor before any meaningful drywall exposure.
PPE Recommendations for the Whole Household
Anyone entering the work area should wear at minimum an N95 respirator. Children, pregnant household members, and pets should stay out of the work area completely. Goggles protect the eyes from both dust and the irritation of mask straps, and cheap safety glasses are sufficient for casual work.
FAQ
How to keep dust out during renovation?
Seal the work area with 4 mil plastic sheeting hung from zip wall poles, turn off the HVAC system, cover every supply and return vent with magnetic covers, and run a box fan exhausting air out a window to create negative pressure. These four steps together stop the majority of dust from traveling beyond the work zone.
How do you reduce drywall dust?
Reduce drywall dust at the source by attaching a Shop-Vac hose directly to the sanding tool, switching to wet sanding for finish passes, using dust-reducing joint compounds, and keeping the work area sealed with plastic barriers. Exhausting air outside with a box fan lowers the concentration of airborne particles during the work itself.
How harmful is breathing in drywall dust?
Breathing in drywall dust is harmful with repeated exposure because the fine particles can irritate airways and, over years, contribute to chronic respiratory conditions. The silica content in many joint compounds is the primary long-term concern. Single short-term exposures cause temporary eye, nose, and throat irritation rather than permanent damage.
Will N95 protect against drywall dust?
Yes, an N95 respirator protects against drywall dust when properly fitted with a tight seal around the nose and mouth. N95 filters capture at least 95 percent of particles in the dust size range. For extended exposure, upgrade to a P100 reusable respirator for a stronger margin of protection.
Final Thoughts: Putting It All Together
Controlling drywall dust during a renovation comes down to one principle: stop dust at the source, exhaust what you cannot stop, and clean what you cannot exhaust. A serious dust control plan takes about an hour to set up but saves days of cleanup afterwards. The same seven-step method above works whether you are patching a single room or finishing a full basement, and it scales to whatever budget you have.
Start with the planning checklist in this guide, lay plastic, kill the HVAC, and let a box fan do the heavy lifting. Run a damp mop every evening, swap the furnace filter at the end of the project, and wear an N95 whenever you enter the work zone. Our team has used this exact process on dozens of renovations through 2026, and it is the single most reliable way we know to keep a home livable during drywall work.
2 thoughts on “How to Control Drywall Dust During a Renovation (September 2026) Honest Reviews”